Warning: "continue" targeting switch is equivalent to "break". Did you mean to use "continue 2"? in /home/choste/public_html/press/wp-content/themes/suffusion/functions/media.php on line 669

Warning: "continue" targeting switch is equivalent to "break". Did you mean to use "continue 2"? in /home/choste/public_html/press/wp-content/themes/suffusion/functions/media.php on line 674

Warning: "continue" targeting switch is equivalent to "break". Did you mean to use "continue 2"? in /home/choste/public_html/press/wp-content/themes/suffusion/functions/media.php on line 687

Warning: "continue" targeting switch is equivalent to "break". Did you mean to use "continue 2"? in /home/choste/public_html/press/wp-content/themes/suffusion/functions/media.php on line 692

Warning: "continue" targeting switch is equivalent to "break". Did you mean to use "continue 2"? in /home/choste/public_html/press/wp-content/themes/suffusion/functions/media.php on line 697
2012 March » UnRulyRecursion » Page 3
Mar 072012
 

Here is where additional info will be posted for the project. Currently all info that I do have is in the below-pasted proposal, and past experience designing or building computer cases.


Seed Grant Proposal

Computer Case Project

What is It?

The computer case project is just that, a case that will be laser cut from Lexan that will house a minimal computer, (m-Atx motherboard and smaller) with the intention of being an attention-grabbing set-top box/front-end for a media setup.

Origin:

This project is actually not original, but was inspired by a project I stumbled across on Ponoko (a mail order laser cutting service) that was submitted by another user (project page here: http://www.ponoko.com/design-your-own/products/mini-itx-computer-2078). This immediately struck me as a (fairly) unique case that can be modified and personalized by the user. This along with the design challenges of organizing and anchoring the components in a logical manner are what fuels my motivation.

Design and Considerations:

I have designed lexan cases in the past, however have never actually built one. The limited factor was indeed the cost of the laser cutting service. I will have to design this case from scratch, but have worked extensively with computer components, so it will not take long. Some considerations that I will take into account include: ample cooling, and slide in assembly/mounting of drives.

The case will probably hold the following: m-Atx motherboard/cpu/RAM, a power supply, an SSD OS drive, an HDD high capacity storage drive, a slim ODD, and several case mounted fans.

Skills Needed:

The skills needed to build this project include a knowledge of SolidWorks or another CAD package in order to construct the model. I will also need to make sure I am taking accurate measurements of the components. All told, intelligent design will be the most important skill, and basic assembling will be secondary.

Bill of Materials:

Item Store Approx Unit Price Qty Total
Acrylic (colored) (open to advice)

$30

4 (24”x24”)

$120

Assorted Hardware Home Depot

$15

$15

Total

$135

Goals and Scope:

The goal of this project is to have a complete case before the end of the semester. Ideally it would be done far before that. I would estimate the cutting time to within a few hours, and the assembly time to something similar. The bulk of the time to be put into this project is in the design of the case. It is entirely possible for me to design this case over the next few weeks and have it ready to go beyond that. Another benefit to this project is that I can make my files available to anyone who is interested duplicating the project, or possibly even working with someone who would like to adapt the idea to their own setup (or a computer in the lab!).

More Information:

More information is be available upon request, and may be available (if I have time to put it up…) at http://unrulyrecursion.com/press/2012/03/computer-case-project/
Mar 072012
 

Updated: March 11, 2011


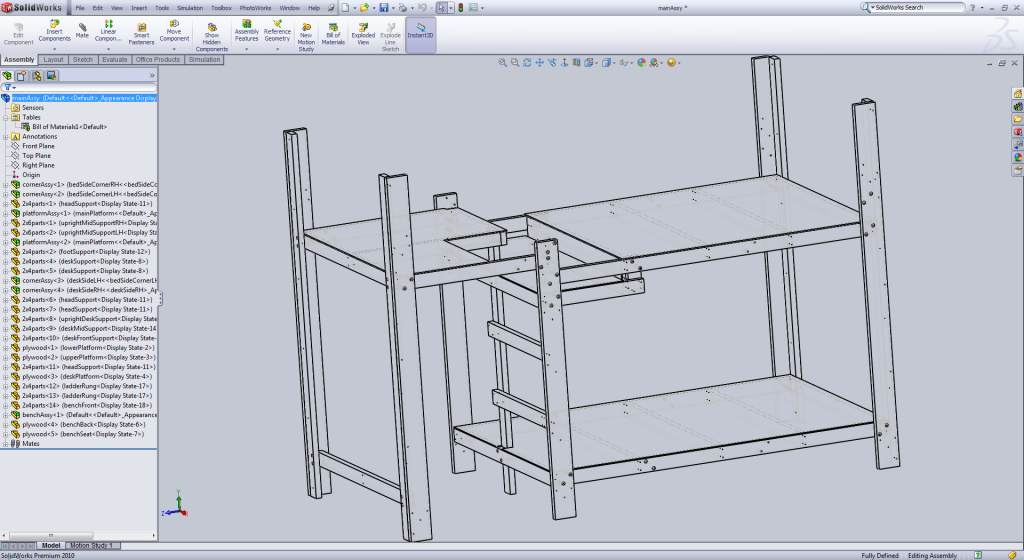
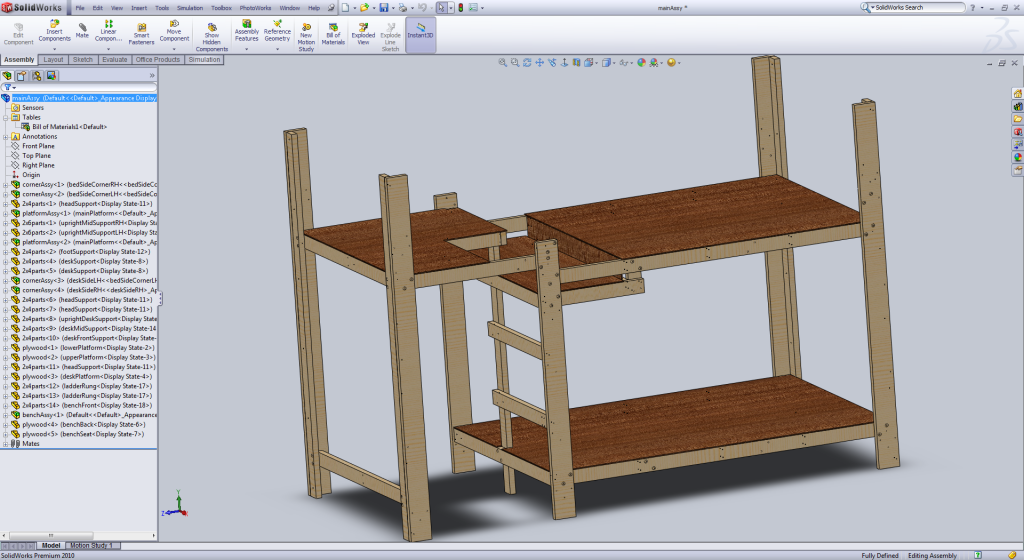
Here is where additional info will be posted for project bedloft. Currently all info that I do have is in the below-pasted proposal and a dropbox folder of mine, which includes things like justifications for board calculations and what-not.


Files

Initial Hand Sketch

SolidWorks Generated BOM (not formatted wonderfully)

SolidWorks Model


Currently Unimplemented Features

Not Hand Drafted
-Plywood insert to allow bed in upper
-Side Attachment (bed-size)
–Built in bedside table
–Built in desk under attachment
–Hinge Down extension to accomodate a bed
—Hinged (to vert. supports) support for bed
-Hinged/Fold over cover to allow additional desk space
-Sway Bracing

Change
-Bottom Platform to be more low waste and compact
–No plywood, 2×4’s and 1×4’s for slats,
(two assemblies that mate)
–Not attached to rest of loft (has own legs),
but does mate with it (slats overhang 2×4’s of loft)


Pictures


Seed Grant Proposal

Project BedLoft

What is It?

Project BedLoft is exactly that: a lofted bed that supports up to a queen size mattress. Other amenities that it has includes a desk space for two, and the option for the seat to be covered to make all the space on top storage space. Additionally there is space under the bed for small things to be stored.

Origin:

I conceived of this project to solve the problem of a cramped living space. Like most college students, I am mostly confined to one or two rooms wherever I am (currently I am off campus), and my room is generally stuffed full of my stuff. Building a way to utilize currently unused space would greatly help organize the room and lower stress levels (being stressed when things are overly messy).

Design and Considerations:

I designed this about a year ago, when I was in a different living situation (a coop apartment in South Carolina) that was very small. The bed size was chosen based on what mattresses I already had. The addition of the desk was something that I thought was cool, and would be a place where I could set up my computer(s) and be able to have them correct no matter what other furniture is available to me. In designing the desk, and the rest of the bed, there was a lot of visualization to get the right dimensions/proportions, and some searching online to find how professionals do things (like the height from the desk chair to the desk surface ~ 10 inches, by the way). Another feature of the bedloft is how easily it can be taken apart for storage or transportation. I designed it to break down into small pieces that were mostly flat such that it could be transported to and installed in a new place relatively easily. One would only need break it down and move the pieces, instead of try to finagle a huge mattress frame through hallways and doorways. The hardware holding it together is designed as lag bolts and t-nuts, which would make it easier to disassemble and reassemble, and most are designed to be the same type, so it is hard to use hardware in the wrong place.

Skills Needed:

The skills needed to build this project include a knowledge of SolidWorks for manipulating the current model to ensure it meets the requirements of my current living space, and to use as a template and guide for construction. Beyond that, I will need to be able to safely use a variety of power tools including (but not limited to) a miter saw, a table saw, and a drill press.

Bill of Materials:

Item Store Approx Unit Price Quantity Total
2×4 lumber (stud) Home Depot

$4

20

$80

2×6 lumber Home Depot

$5

6

$30

4’x8′ Plywood Home Depot

$25

3

$75

5/16th Lag Bolts Home Depot

$40

1 (box 50)

$40

5/16th T-Nuts Home Depot

$1

14 (4 pack)

$14

Forstner Bit
(if needed)
Home Depot

$11

1

$11

Total

$250

Goals and Scope:

This project could easily be done in less than a week, given all day every day to work on it. However, with my time constraints, coupled with finding a ULI to work in there with me, I would overestimate the project to take a month, which would be before the end of the semester. I would likely be able to take advantage of lab hours on most Tuesdays and Thursdays.

More Information:

More information is be available upon request, and may be available (if I have time to put it up…) at http://unrulyrecursion.com/press/2012/03/project-bedloft/

Mar 072012
 

A Proposal by Sterling Peet

Problem Statement

I have a cat that is terrible at using the litter box. I have a taken measures including using a litter box with a top and purchasing quality, scented, clumping kitty litter to help combat the issues, but the current situation is not sufficient. My cat does not understand the concept of burying her business, and thus my closet routinely smells like a small animal graveyard. Due to the configuration of my closet, bedroom, and other living arrangements, this aroma saturates my bedroom, and this is unacceptable.

A secondary complaint about my cat concerns her weight. That is, she has too much of it. She is fat. The solution for this is to feed her a measured amount of food, rather than just topping off the bowl all the time. Unfortunately, this also means she will wake me up in the morning to be fed, and I need to be available to feed her on a regular schedule. This is not compatible with my school schedule, so I want to build an automatic dispenser that can feed her the allotted amounts at appropriate times.

Project Requirements

The Primary goal is to exhaust the egregious odor out of the window in my closet [no, I don’t know why my closet has a window, but it makes a convenient place to pierce the brick wall for ventilation].

The opened window also needs to be discreet from the inside, the opening must be [mostly] only exhausting air, and located behind some piece of furniture to obscure and otherwise plug the opening.

The cat does not like having a gale force breeze blowing between her legs while using the litter box, so the exhaust fan must be controllable, preferably variable speed, and be able to sense the cat’s presence.

Secondary requirements include being able to feed the cat without needing human intervention on school days, a water dish with an overflow tray and catch bottle (she is a messy drinker), a remote administration and monitoring interface, and a place for the cat to play or look out the window. Additionally, the closet has ethernet, but not 110 AC.

Design Solution

To solve the primary problem and satisfy the design requirements, I plan to build a wooden cat tree to house the litter box, automated feeding bowl and water dish, cover the opening in the window, and contain a fan loaded exhaust duct. The duct will have a louver that closes when the fan is not blowing, in order to keep out critters and weather when not in use. The cat feeder and fan blower will be arduino based custom embedded circuits, and to provide reliable and maintenance free power and communication, the project will use a simple ethernet communication protocol and power over ethernet for the power supply. The fan circuit will employ an IR motion detector similar to those used for automatic doors to detect the cat entering and exiting the litter box.

Skills Summary

All of the skills required for this project are either skills in which I am already proficient, or I know that I am within reasonable reach of obtaining. The planning will require a drafting skills in Autodesk Inventor for the mechanical and EagleCAD schematic capture and board layout skills for electrical aspects. I have already proto-typed an arduino circuit that checks an IR motion sensor and appropriately controls a computer case style fan. The power over ethernet aspect is something that I wish to learn about, but I have a contact in the GT GVU that has down POE design, and I have already convinced him to teach me about it. The final aspect of this project requires programming skills, making this a particularly cross-discipline project.

Project Completion

This project is one that I feel is within reach of completing by the end of the semester. The most unlikely parts to complete are the final electronic assembly and programming, but the design of the electronics would be complete; with parts and circuit boards on order. The plan will be to start with the mechanical design of the cat tree to accommodate the litter box, exhaust duct, window opening, external vent louvers, and physical interface for the cat feeder and water bowl. Next the final fan control electronics will be developed, followed by the POE and ethernet communication interface. Finally, the feeder and water bowl will be developed along with the associated electronics. The only portion that I feel is questionable to complete by the conclusion of the semester is feeder and water bowl electronics, and again, this would be a result of waiting on circuit boards and parts to arrive.

Bill Of Materials

Item Unit Cost Qty extended
2x2x4′ $3 6 $18
3/8″ Plywood $20 1 $20
Fans $10 2 $20
Custom Fan Control Circuit $40 1 $40
Arduino $35 2 $70
Custom Power Over Ethernet Circuit $50 1 $50
IR Motion Sensor $10 1 $10
Custom Cat Feeder Circuit $40 1 $40
Cat Feeder NEMA17 Stepper Motor $20 1 $20
Total $288