http://platform.netbeans.org/tutorials/nbm-quick-start.html
http://platform.netbeans.org/tutorials/nbm-osgi-quickstart.html
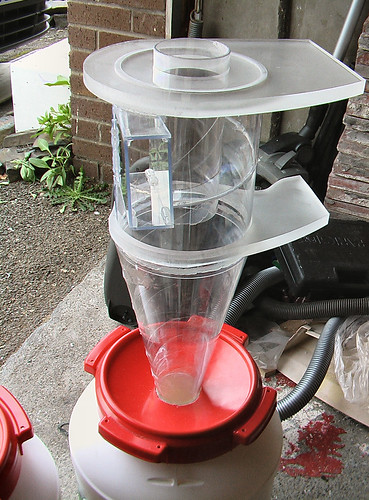
There are several situations, both at home and in the Invention Studio, that could benefit from dust removal. In particular, the laser cutter air filters would last much longer if the dust was separated from the air before the air is filtered. The belt sander and band saw could avoid spewing quite so much sawdust into the air if the dust collection ports were utilizing a dust separator to capture the sawdust. Sawdust collected from these places does not get inhaled nor need to be cleaned off of the floor.
A cyclonic dust separator can collect low or high volumes of dust from the air. Small versions of such cyclonic separators can be operated from a relatively large shop vacuum, although medium sized cyclonic separators require a custom brushless motor and controller to operate efficiently. The designer of the spreadsheet calculator for this project claims his 6 inch version is measured to provide 99.9% separation efficiency on particles sized under 5-microns.
http://billpentz.com/woodworking/cyclone/cycloneplan.cfm
Bill Pentz’s Cyclone Worksheet
Here is a better view of the apparatus:
| Item | Unit Cost | Qty | extended |
|---|---|---|---|
| McMaster 3″ Acrylic Tube 8486K367 | $24 | 1 | $24 |
| McMaster 6″ Acrylic Tube 8486K397 | $29 | 1 | $29 |
| 12x12x1/2″ Acrylic Sheet 8560K265 | $30 | 2 | $60 |
| 48x48x.060″ Acrylic Sheet 8560K177 | $42 | 1 | $42 |
| Total | $155 |
Limited build space for 3D plastic models is the current limitation of Open Source 3D printing. Systems like RepRap, Makerbot, and Ultimaker have made such significant improvements in the print quality, speed and reliability in the last year, that the size of the printable space is becoming one of the bigger constraints. A particular application for such large print space is building parts for model airplanes. These parts require very light weight from minimal infill, and the strength of being built as a single part. Slicing the parts into multiple pieces for separate printing is not appropriate for these applications.
I have already begun building a very large format 3D printer to experiment with printing large parts, but the cartesian robot is not complete and needs funding to finish development.
This project should be easily completed by the end of the semester, and be printing parts in the Invention Studio. I would be willing to leave it in the invention studio for other people to use until the 3mm plastic is used up, or two semesters. Afterwards, I would also be willing to print items for the studio from home, provided I am compensated for the plastic.
| Item | Unit Cost | Qty | extended |
|---|---|---|---|
| Makerbot 3/8″ linear Bearings | $15 (4 bearings) | 3 | $60 |
| 36×3/8″ Precision Shaft A 7X 1-1236A | $29 | 4 | $116 |
| 16×3/8″ Precision Shaft A 7X 1-1216A | $13 | 6 | $78 |
| MakerBot Motherboard v2.4 | $85 | 1 | $85 |
| Arduino Mega | $65 | 2 | $65 |
| Total | $404 |
Here is where additional info will be posted for the project. Currently all info that we do have is in the below-pasted proposal, and past experience designing and building a lightsaber hilt.
Maker’s Club Seed Money Proposal
Lightsaber Construction Quest
The idea is to make a Lightsaber that is suitable for using as a dueling prop. The project entails machining an aluminum bar stock to the correct internal dimensions to fit the blade, as well as to be aesthetically pleasing (AKA awesome looking).
Devon and I have been very interested in fan videos and spinoffs of the Star Wars series since we first watched it. Indeed we have produced a few videos inwhich we wield the iconic weapon in an attempt to destroy eachother. It has been a lot of fun so far, but we would like to step it up to the next level (being that of Ryan Wieber, who lead the charge in fan-made lightsaber videos). Quality props would allow us to increase the realism of the scenes as well as reduce the number of props needed due to breakage.
Design and Considerations:
The general construction philosophy is based of Ryan Wieber’s Novus at www.sabershop.com (and his carbon fiber blade will be used for the blade itself). Techniques will be drawn from the many sabers created at www.slothfurnace.com. We plan to use the lathe and mill to shape the aluminum into the hilt, and create a pin mechanism to hold the carbon fiber blade steady against the inside of the hilt. It will be important to not have sharp edges around the lip of the hilt so as to reduce fatigue and chance of breakage of the blade. We also plan on machining the hilt in several interlocking parts such that shock absorbing o-rings can be used on the inside to extend the life of the blade itself.
The main skill needed in this project will be operation of the lathe. It will be important to have knowledge of how to safely use the lathe to create the shapes that we create. A secondary skill will be use of a CAD package in order to have an idea of how we want the lightsabers to look. Additionally, with interlocking parts the solid models will be useful for guaranteeing the feasibility of the interaction. One thing that Taylor brings to the project is the experience of using a lathe to make a similar prop (also out of aluminum, but for a different size blade), and can guide the process down the right path.
| Item | Quantity | Approximate Cost |
|---|---|---|
| Aircraft Aluminum 6061 (9056K273 Mcmaster Carr) |
3 ft |
$45 |
| Carbon Fiber Blade (SaberShop) |
2 |
$72 |
| Assorted Rods, paint, and other trinkets |
$53 |
|
| Total |
$170 |
This project is fairly simple in its setup (requires us to model the lightsaber in CAD). Realistically this project can be complete in about two weeks, so We could have some really cool props to show off by the end of the semester, even if we take a little longer than two weeks to finish.